 +91-8353949686, +91 9266169686 | Email care@labxe.com

How to Use a Micropipette: A Complete Guide for Accurate Laboratory Work
A micropipette is one of the most frequently used liquid-handling instruments in modern laboratories. It allows users to measure and transfer very small quantities of liquid, often in microliters (µL), where even a small handling mistake can affect the final result.
Learning how to use a micropipette correctly is therefore not simply about pressing the plunger and transferring liquid. Proper volume selection, compatible tips, controlled aspiration, correct dispensing and good pipette maintenance all contribute to reliable laboratory work.
This guide explains the complete micro pipetting process in a practical way so that students, laboratory technicians, researchers and other lab professionals can understand the technique and avoid common mistakes.
What Is a Micropipette?
A micropipette is a precision laboratory instrument designed to measure and transfer small volumes of liquid. Depending on the model, a pipette may have a fixed volume or an adjustable volume range.
LABXE offers fixed and variable-volume micropipettes in different ranges. Its LFC series, for example, includes models covering applications from very small volumes up to larger liquid-handling requirements.
Micropipettes are commonly used in:
- Molecular biology
- Biotechnology
- Pharmaceutical laboratories
- Pathology and diagnostic laboratories
- Academic research
- Food and chemical testing
- Quality-control laboratories
- Routine sample preparation
The important point is that a micropipette is a precision measuring instrument, so technique matters just as much as the instrument itself.
How Does a Micropipette Work?
Most common laboratory micropipettes operate using a piston-based mechanism.
When the plunger is pressed and released, the movement of the piston creates a controlled air displacement that allows liquid to enter the disposable tip. The operator then presses the plunger to dispense the liquid.
A typical micropipette plunger has two important positions:
First stop: Used during normal aspiration and initial dispensing.
Second stop: Used to expel the remaining liquid from the tip during dispensing.
The exact operating procedure can vary by pipette design, so users should always follow the manufacturer’s instructions for their specific instrument.
ISO 8655-1:2022 provides general requirements and user recommendations for piston-operated volumetric apparatus, while ISO 8655-2:2022 specifically addresses piston-operated pipettes and their metrological requirements.
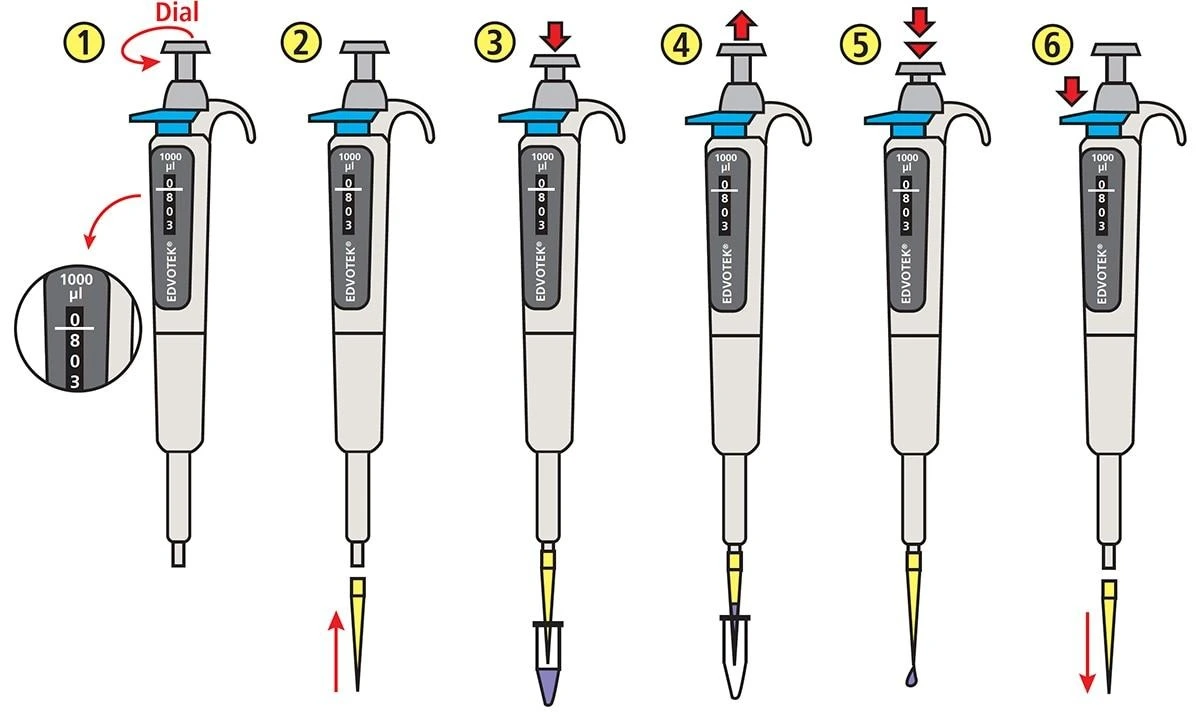
How to Use a Micropipette: Step-by-Step
1. Choose the Correct Micropipette
Start by identifying the volume you need to transfer.
For example, if your application requires 100 µL, select a pipette whose specified operating range includes 100 µL.
Do not select a pipette simply because it can display the required number. Using an appropriate volume range helps the instrument perform within its intended operating conditions.
LABXE provides different fixed and variable-volume models, including ranges such as 5–50 µL, 10–100 µL, 20–200 µL and 100–1000 µL.
Basic rule:
Choose a pipette suitable for the volume you actually need to transfer.
2. Select the Correct Pipette Tip
The tip is the part that directly contacts the sample, so choosing a compatible tip is essential.
Before starting:
- Check the pipette model.
- Select the appropriate tip size.
- Make sure the tip is clean and suitable for the application.
- Use a fresh tip when contamination between samples must be avoided.
The tip should fit securely onto the pipette cone without excessive force.
A loose or poorly fitted tip can affect liquid delivery and may introduce leakage or inconsistency.
3. Set the Required Volume
If you are using an adjustable micropipette, rotate the volume adjustment mechanism until the required volume is displayed.
For example, if the required volume is 100 µL, set the pipette to 100 µL before attaching or aspirating the sample according to your laboratory’s operating procedure.
Never force the adjustment mechanism beyond the stated operating range.
For LABXE variable-volume models, the available volume ranges and increments differ by model, so the selected instrument should match the application’s required volume.
4. Attach the Tip Properly
Hold the micropipette vertically and press the tip cone into the appropriate pipette tip.
Apply enough pressure to create a secure seal.
Avoid excessive force because unnecessary pressure can damage the tip cone or tip.
Once attached, check that the tip is firmly seated before beginning the liquid transfer.
5. Press the Plunger to the First Stop
Before placing the tip into the liquid, press the plunger down to the first stop.
This prepares the pipette for aspiration.
Keep the movement controlled rather than pushing the plunger abruptly.
Good pipetting is generally a controlled process. Rapid or inconsistent plunger movement can contribute to variation, particularly when working with small volumes.
6. Aspirate the Liquid
Place the pipette tip into the liquid to an appropriate depth.
Keep the pipette reasonably vertical and release the plunger slowly and smoothly.
As the plunger returns, liquid enters the tip.
Do not immerse the tip unnecessarily deep into the sample. Excessive immersion can increase the chance of contamination and may affect aspiration consistency.
A controlled aspiration technique is particularly important when working with small volumes.
7. Move the Pipette to the Receiving Vessel
After aspiration, move the pipette to the destination vessel.
Avoid unnecessary shaking or rapid movement.
Keep the tip from touching surfaces that could contaminate the sample.
For critical applications, the operator should maintain consistent technique from one sample to the next.
8. Dispense the Liquid
Place the tip against or just above the appropriate area of the receiving vessel, depending on your laboratory procedure and the type of liquid being handled.
Press the plunger smoothly to the first stop.
Then continue to the second stop to expel the remaining liquid from the tip when appropriate.
Finally, allow the plunger to return to its normal position.
The exact dispensing technique can depend on liquid characteristics and the pipette design.
9. Eject the Used Tip
Once dispensing is complete, press the tip-ejection mechanism and discard the used tip in the appropriate waste container.
Do not reuse disposable tips between samples when doing so could introduce contamination or compromise the experiment.
Using a fresh tip is especially important when transferring different samples or working with sensitive biological materials.
Micropipette First Stop vs Second Stop
Understanding the two plunger positions is one of the most important parts of learning how to use a micropipette.
| Plunger Position | Main Purpose |
|---|---|
| First stop | Used for controlled aspiration and the initial dispensing action |
| Second stop | Used to expel remaining liquid from the tip |
The two-stop mechanism provides controlled piston movement during liquid handling.
However, the correct technique can differ between standard pipetting, reverse pipetting and particular liquid types. Always follow the manufacturer’s instructions and your laboratory’s validated procedure.
Common Micro pipetting Mistakes to Avoid
Even a high-quality micropipette cannot compensate for poor technique. Some common mistakes include:
Using the Wrong Volume Range
A pipette should be selected according to the volume required rather than simply choosing the largest available instrument.
Setting the Wrong Volume
Always check the volume display before aspirating the sample.
Moving the Plunger Too Quickly
Fast plunger movement can make liquid handling less consistent.
Holding the Pipette at an Incorrect Angle
Maintain a stable position during aspiration and dispensing.
Using an Incorrect Tip
A compatible, properly fitted tip is important for consistent liquid transfer.
Touching the Tip to Contaminated Surfaces
The tip should only contact appropriate sample and vessel surfaces.
Reusing Disposable Tips
Changing tips between samples can help reduce cross-contamination.
Ignoring Calibration and Maintenance
Precision instruments require appropriate inspection, cleaning and calibration procedures.
How to Improve Micropipette Accuracy
Accurate pipetting is influenced by both the instrument and the person using it.
For better results:
- Use the correct pipette range.
- Use compatible tips.
- Set the volume carefully.
- Aspirate slowly and consistently.
- Maintain a consistent pipette position.
- Avoid unnecessary contact with vessel walls.
- Change tips when required.
- Keep the pipette clean.
- Follow the manufacturer’s maintenance instructions.
- Perform calibration or verification according to your laboratory’s requirements.
ISO 8655 establishes requirements and recommendations relevant to piston-operated volumetric instruments, including pipettes.
When Should a Micropipette Be Calibrated?
Calibration and verification are important parts of maintaining confidence in liquid-handling performance.
The appropriate interval depends on factors such as:
- Frequency of use
- Application requirements
- Laboratory quality procedures
- Environmental conditions
- Manufacturer recommendations
- Regulatory or accreditation requirements
For laboratories where volume accuracy is critical, calibration should be managed through an appropriate documented quality system.
LABXE states that its micropipette range is designed for calibration and quality-control requirements, with calibration reports provided for its LFC models.
Micropipette Care and Maintenance
A micropipette should be treated as a precision instrument rather than an ordinary laboratory accessory.
After use:
- Remove the disposable tip.
- Clean the instrument according to the manufacturer’s instructions.
- Check the tip cone and external surfaces.
- Store the pipette appropriately.
- Avoid dropping or unnecessarily impacting the instrument.
- Follow the recommended service and calibration schedule.
Some LABXE models are designed with autoclavable components, which can be useful in laboratories requiring suitable sterilization procedures. However, users should confirm the specific model’s autoclavability instructions before autoclaving.
Where Are Micropipettes Used?
Micropipettes are used wherever small-volume liquid transfer is required.
Research Laboratories
Researchers use micropipettes for sample preparation, reagent handling and experimental workflows.
Biotechnology
Precise liquid transfer is common in molecular and biotechnology procedures.
Pharmaceutical Laboratories
Micropipettes can support laboratory testing, formulation work and quality-control activities.
Diagnostic Laboratories
Small-volume samples and reagents often require controlled liquid handling.
Educational Laboratories
Micropipettes are also valuable for teaching students fundamental laboratory techniques.
Why Technique Matters More Than Simply Owning a Good Pipette
A precision instrument is only one part of accurate liquid handling.
Consider two operators using identical pipettes. If one operator consistently changes the aspiration speed, uses unsuitable tips or selects an inappropriate volume range, their results may differ from those of an operator following a controlled procedure.
That is why laboratory training should combine:
Correct instrument + correct tip + correct volume + consistent technique + appropriate maintenance
This approach helps create more repeatable liquid-handling practices.
LABXE Micropipettes for Laboratory Liquid Handling
LABXE manufactures and supplies liquid-handling systems under its LABXE and SSCIENCES brands. Its product range includes single-channel and multichannel micropipettes as well as different fixed and variable-volume models.
The LABXE LFC range includes fixed-volume models and adjustable models extending from small-volume applications to larger liquid-transfer requirements. The product page also describes features such as an ergonomic design, adjustable volume setting, autoclavable components on applicable models and calibration documentation.
For laboratories evaluating a new micropipette, the important factors are not simply the brand name. Consider the required volume range, accuracy requirements, tip compatibility, ergonomics, maintenance requirements and application.
Frequently Asked Questions
What is a micropipette used for?
A micropipette is used to measure and transfer small quantities of liquid accurately, commonly in microliter volumes.
How do you use a micropipette correctly?
Select the correct volume range, set the required volume, attach a compatible tip, aspirate the liquid using controlled plunger movement, dispense it into the receiving vessel and eject the used tip.
What is the first stop on a micropipette?
The first stop is the initial plunger position used during normal aspiration and dispensing operations.
What is the second stop on a micropipette?
The second stop provides additional plunger travel for expelling remaining liquid from the tip during dispensing.
Can micropipette tips be reused?
Disposable tips are generally intended for single-use applications where contamination or sample carryover is a concern. Follow your laboratory’s SOP and the tip manufacturer’s instructions.
How can I improve pipetting accuracy?
Use the correct volume range, compatible tips and consistent aspiration and dispensing technique. Regular maintenance, calibration or verification can also be important depending on the application.
How often should a micropipette be calibrated?
There is no single interval that applies to every laboratory. The appropriate schedule should consider usage, risk, laboratory quality procedures, manufacturer recommendations and applicable requirements.
Final Thoughts
Learning how to use a micropipette correctly is a fundamental laboratory skill. The process may look simple, but accurate liquid handling depends on several small details: choosing the right pipette, selecting a suitable tip, setting the correct volume, controlling aspiration and dispensing, preventing contamination and maintaining the instrument properly.
With consistent technique and appropriate instrument care, laboratories can build more reliable and repeatable liquid-handling practices.
If you are looking for a micropipette for laboratory, research, diagnostic or industrial applications, explore the LABXE liquid-handling range and select the model according to your required volume and application.
Explore LABXE Liquid Handling Systems
For bulk orders and product enquiries:
LABXE Export Pvt. Ltd.
Email: micropipettesprice@gmail.com
Phone: +91-8353949686